I’ve been keeping a monthly music journal for over 10 years now. Many of my friends get my monthly mixes and I’ve had more than a few ask me just how I go about doing it and what tools I use. Up until last year, I didn’t have a good answer, but now that I do, I’m willing to share the secrets to making the perfect digital mixtape. This isn’t about the mix itself. That’s something else entirely and is a pretty personal thing. I don’t mess around with Windows much, so this is only going to help the Mac users out there. Perhaps someone else can write something up for the PC users.
Step 1: Gather your tools. First and foremost, I highly recommend an iPod of some kind. The reason that I make my mixes on my iPod is because I have music on a few different computers and I don’t want to have to worry about not having the right computer in front of me when I make a mix. As long as the music is on the iPod, then I’m set and so are you. The three pieces of software you’ll need are iTunes, ID3 Editor and Senuti. ID3 Editor will cost you $15, but if you spend any time making mixes for people, then it’s worth it to have good metadata embedded in your MP3s. I’ve tried all the free programs out there for managing ID3 tags and there’s none that works better. Senuti is a simple donationware program that will allow you to get your music from your iPod onto your computer. Don’t worry, it’s not going to break your iPod or your computer.
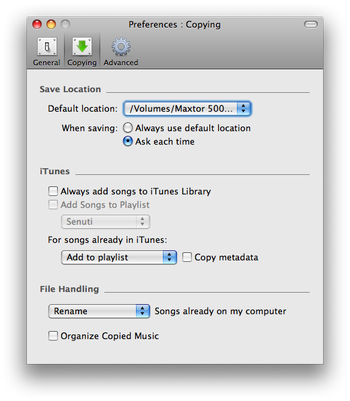
Step 2: Copy our mix from your iPod to your computer. Before you do this, you need to make sure you have the Senuti preferences set up properly. Just make sure your preferences look like mine.

You’ll probably want to create a folder on your desktop (or somewhere else) that will have all of the MP3s from your mix inside. That way, when it comes times to zip the folder up and upload it somewhere, you’ll be one step ahead. So, assuming you have your preferences all set, choose the playlist on your iPod from within Senuti, select all the tracks in the right-hand pane and then click on the transfer button. It will ask you where you want to transfer the songs and you’ll choose ‘Other…’ from the drop-down menu and choose that folder you created a minute ago. Once Senuti finishes transferring the songs, you should now have a folderfull of MP3s.
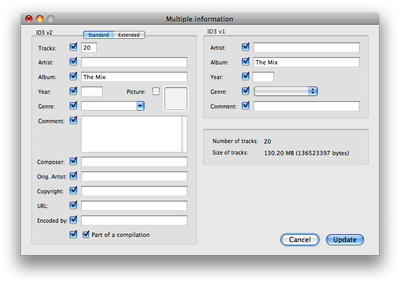
Step 3: Edit the ID3 tags. I suggest doing this as a two-step process. The first step is to clear out any extraneous metadata from the files and to change the album name to your mix name on all of the files at once. If that confuses you, you’ll see what I mean in a minute. First, open ID3 Editor. You’ll notice that nothing happens, but it will say ID3 Editor next to the apple in the upper left hand corner of the screen. From the File menu, choose ‘Open group…’ and select all of the MP3s in that folder you created during the last step. Make sure there is a checkmark next to everything, including the attributes in the Extended section as well. The only entries that you’ll want to fill out in the ID3 v2 pane are Tracks (how many tracks is your mix?) and Album (what are you going to call your mix?). Optionally, you can use some artwork that you may have for your mix as well. In the ID3 v1 pane, the only attribute you will fill out is the Album.

Once you’ve finished with that, click the ‘Update’ button. Now, go to the folder that has all of your files, select all of them and drag them to the ID3 Editor icon that’s in the dock. This will result in a bunch of windows opening up in ID3 Editor, each one representing the individual songs. You’ll need to make sure that the data that is in each of these is accurate, or at least as accurate as you want. In other words, make sure that the Track data of each corresponds to the track number on your mix, the song name is correct, the genre is correct and any other info you want. I know it’s time consuming, but the people that get your mix will thank you for it.
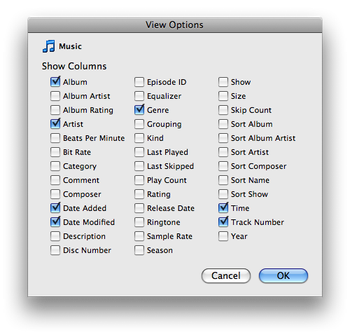
Step 4: Check your work. Remember, the title of this handy how-to includes the word PERFECT. And in order to make sure your work is perfect, you’re going to want to check it. The easiest way to do this is to open iTunes, create a new playlist and drag the folder into that playlist. Everything should look really nice and they should be in the right order. If they aren’t in the right order, there’s a chance that you’re not seeing the Track Number column in iTunes, which you can make visible by going to the View menu, choosing ‘View Options…’ and making sure there’s a checkmark next to Track Number.

Step 5: Zip and upload. You’re now ready to zip the folder up and upload it to a server of your choice. I upload mine to my own personal FTP, but you may want to use something like YouSendIt or Drop.io to distribute your mix. Macs have the ability to compress things into a .zip file built-in, so no need to install any extra software for that. Just go to the folder on your desktop, right click (or ctrl-click if you don’t have a mouse) and choose ‘Compress whatever-the-name-of-your-folder-is’ and it will create a .zip file of that folder, which you can then upload to your server of choice.
Happy mixing!